Vinyl Flooring: Measuring & Fitting
This guide is available as a downloadable pdf here.
Equipment needed: • Pencil • Paper • Tape measure • Calculator •
Measuring
- Measure the length and width of your room at the longest and widest points, remembering to measure into all alcoves and doorways.
- Add 10cm on to the length and width of the carpet, allowing for waste, seams and additional material that may be needed to complete fitting. e.g. The room diagram below would be 5.10m long and 3.10m wide.
- Calculate the price of your vinyl by selecting the correct width options on our price calculator.
- Please note: any patterns, stripes or wood effects run along the length of the roll
Example:
|
The diagram on the right shows an example room which is 3m and 5m at its widest and longest points. We've chosen a room with diagonal corners to demonstrate the ease of measuring an unconventional room shape. a. Always allow for waste by adding 10cm on to the width and length measurements, this would make the total measurements 5.10m x 3.10m.
|
 |
Vinyl Flooring on Stairs
We do not recommend fitting vinyl flooring on stairs, it is specifically made for flat areas, meaning you could damage it when bending it around the step.
- However, if you have a floating staircase, you can fit a piece on each step, fixing with spray adhesive.
Fitting Vinyl Flooring
Preparation
a. Vinyl flooring must be fitted straight to the sub floor.
b. Remove any existing flooring, underlay, nails and grippers.
c. Sweep the area to remove any small stones or objects that could pierce your vinyl.
d. You can fit vinyl flooring on top of laminate, providing it is sound and secure.
e. Place your roll of vinyl flooring into the room where you want it fitted and leave it for 24 - 48 hours, allowing it to acclimatise before fitting.
f. By allowing your vinyl flooring to reach room temperature before fitting, you will get a perfect fit.
Underlay
a. Vinyl Flooring is made to be fitted straight to your sub-floor, concrete or wood planks.
b. It comes with a foam or felt backing, allowing it to absorb impact from footfall.
c. This backing is usually quite dense, helping to prevent punctures from heeled shoes or furniture.
d. Adding an underlay will decrease this resistance and you could puncture and damage your flooring.
Positioning
Vinyl flooring can be quite heavy and difficult to momanoeuvre, so please make sure that you have assistance at hand in the initial stages of positioning your vinyl flooring.
a. Lay your vinyl loosely in to position.
b. Stand in one corner of the room with one foot underneath the vinyl, pull the corner towards yourself to position it.(You may find it easier to push or gently kick the vinyl towards yourself with your other foot.)
c. Repeat this in the opposite corner until you're happy that it's in the correct position.
Fitting
If you are fitting vinyl for the first time, or are unsure which area is easiest to fit first, start along your longest wall and work towards your doorway.
a. If you need to cut the vinyl flooring, leave around 5 - 7cm extra at each edge.
b. Cut a vertical line into the excess in each corner, and trim the overlapping vinyl to allow you to fit it perfectly into the corner.
 |
 |
 |
• Most houses do not have perfect corners.
c. Use the same process as the corners when fitting around door frames and other difficult areas: cut vertical lines down the edges of the difficult areas and then cut the excess away from the floor edge.
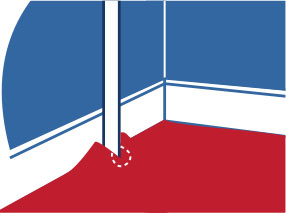
d. When fitting around pipes, cut a straight line from the edge of the vinyl to the pipe. Tuck the edges down and run your knife around the pipe at a 45 degree angle to trim any excess away.
 |
 |
 |
 |
e. Using a carpet tucker or the flat, blunt side of your knife, firmly crease the edge of your vinyl into the skirting.
f. We recommend that you fit a new blade into your knife to ensure a clean cut with no tearing when cutting your vinyl. You can also use scissors, but we always recommend using a knife to ensure a smooth, clean edge.
g. Cut your vinyl flooring by angling your blade at a 45 degree angle into the corner where the skirting meets the floor. Ensure you cut above where the floor meets the skirting so you don't cut it short, leaving around 5mm excess.
h. Repeat this process on the remaining walls.
Finishing
a. When you have positioned and laid your vinyl flooring, simply lift the edges and spray adhesive to the sub floor or use double-sided tape. A full stick installation is necessary where the item measures over 10m2. Also, areas with heavy traffic and or the possibility of furniture being moved around must be fully stuck down not partially stuck or loosely laid
b. Tuck the edges back under your skirting with the flat, blunt side of your blade or with a bolster chisel.
c. Cut the vinyl flush with the flooring in the adjacent room in the doorway.
d. Fit the appropriate door bar over the top and screw into place.